User Role Descriptions & Adding a User
There are six user roles in Incident. Each role has a different level of access in the system and will see slightly different views on their homepage. All roles have the ability to enter new incidents into the system.
User Roles
Administrator
Administrators have full access to everything in Incident. They have the ability to define Locations, Buildings, Areas, and Problem Types. They can add users, create routing rules, and set up the MySchoolBuilding page. Administrators can easily see all incidents in the system from the "Incidents by Status" section on their homepage. They can assign incidents to all users and run all reports.
Supervisor I
Supervisors can access all portions of the system except for the Account Setup tab. In the "Incidents by Status" section of the homepage, Supervisors will only see incidents assigned to themselves or to any of their direct reports. They have access to all reports and can search for all incidents via the search or advanced search.
Site Resource I
The Site Resource I is your first line defense for simple incidents at a Location. If they are unable to resolve the issue, they have the ability to route the incident to a user with a higher skill set. They will only see incidents assigned to themselves on their home page, however, they can run a search to view any incident at their assigned location(s).
Technician
On their homepage, Technicians will see their assigned incidents as well as incidents in their work queues. They can assign incidents to other users and also assign work queue incidents to themselves. Technicians can add their own labor hours and material purchases to incidents, as well as mark them complete. They have the ability to search for all incidents via the search or advanced search features.
Site Administrator
Site Administrators are responsible for approving incidents that are routed to them. They have view-only access to all incidents for their assigned Location(s). Site Administrators have the ability to enter new incidents for their Locations.
Requester
Requesters are only able to enter new incidents into the system. Once they have entered a request, they can view it to see updated information but are not able to make changes to it. Requesters use the MySchoolBuilding page to enter requests and are the only role able to register themselves into the system when given the correct information by Administrators. They can submit requests for any Location.
Comptroller
The Comptroller is not an actual user role in Incident, rather it is an extra level of responsibility above the role. If the system does not know who the incident should be assigned to, either through a lack of or an error in the routing rules, it will automatically assign the incident to the comptroller. This ensures that every New Request is assigned to a user in the system. Only one user can be designated as the comptroller for the account.
How to Add Users
- Click on the Account Setup tab.
- Click on the Users link. (You can also hover your mouse over the Shortcuts menu and select the Manage Users link from the list.)
- Click the Add User link above the right side of your user list.
- If you have users in other Dude Solutions applications, you will be directed to a Registered Users page. The Registered Users drop down list will show all users in other Dude Solutions applications that are not users in Incident. If the person you wish to add is in that list, select their name and click Add This User.
- If the person is not in the list, click the New User button.
Adding Registered Users
- After clicking the Add This User button, you will need to select the Role for this user.
- Choose the Escalation Priority for this user. This tells the system; when this particular user enters a request, automatically assign it with this priority level.
- Check the box if you want this user to be the Comptroller for the account.
- Click Next Step to continue.
- On the Participant Information screen, the user's login name, password, and contact information will automatically be pulled over from the information in their other Dude Solutions account.
- The rest of these fields on this page are not required and can be added at any time. Click Next Step to continue.
- If Location assignments apply to the user role, select them by checking the corresponding check box(es). *Note: Location(s) assignments are only necessary when setting up a Site Resource I and Site Administrator I. You can assign a Location to a requester, however, this makes them a Power Requester and broadens their view in the system. Instead of only being able to see the requests they have made in the system, a Power Requester will be able to see all requests and will receive email notifications for all requests at their assigned Location(s).
- Define Work Queue(s) for this user. This is optional and only applies to Administrators, Supervisors, Site Resource I's, and Technicians. Work Queues allow you to route certain incidents to a group of Incident users. Here you can assign the user to existing work queues.
- To define a user's Labor Rate, either select a predefined rate from the drop down box or select "Other Rate" and type it in the box provided. This is an optional step. *Note: If you do not want to put exact hourly rates for each of your users, a good best practice is to put in an average rate for them. This way, you are able to get a good idea what it is costing to do the work for the particular incident, but do not expose individual rates of your employees.
Adding New Users
- After clicking the New User button, you will need to select the Role for this user.
- Choose the Escalation Priority for this user. This tells the system; when this particular user enters a request, automatically assign it with this priority level.
- Check the box if you want this user to be the Comptroller for the account.
- Click Next Step to continue.
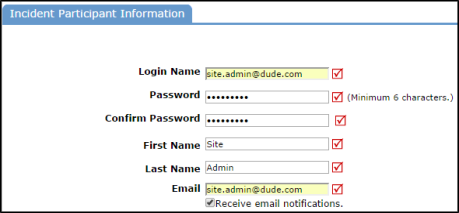
- On the Participant Information screen, you will need to enter a Login Name, Password, First and Last Name, and Email Address for the user account.
- Login Name - No character limit, but the name must be unique to all of our Dude Solutions clients. We recommend using the person's email address as their Login Name.
-
Password - Must be at least 12 characters long and include one mixed case character, one number, and one special character.
-
Email Address - If the user does not have a valid email address, create a unique email address using your organization's domain.
-
Receive email notifications - If the user does not want to receive any automatic email notifications, uncheck this box.
- Click Next Step to save.
- If Location assignments apply to the user role, select them by checking the corresponding check box(es). *Note: Location(s) assignments are only necessary when setting up a Site Resource I and Site Administrator I. You can assign a Location to a requester, however, this makes them a Power Requester and broadens their view in the system. Instead of only being able to see the requests they have made in the system, a Power Requester will be able to see all requests and will receive email notifications for all requests at their assigned Location(s).
- Define Work Queue(s) for this user. This is optional and only applies to Administrators, Supervisors, Site Resource I's, and Technicians. Work Queues allow you to route certain incidents to a group of Incident users. Here you can assign the user to existing work queues.
- To define a user's Labor Rate, either select a predefined rate from the drop down box or select "Other Rate" and type it in the box provided. This is an optional step.
